All Posts By: NANCY DeLUCIA REAL

Home » Articles posted by NANCY DeLUCIA REAL (Page 22)

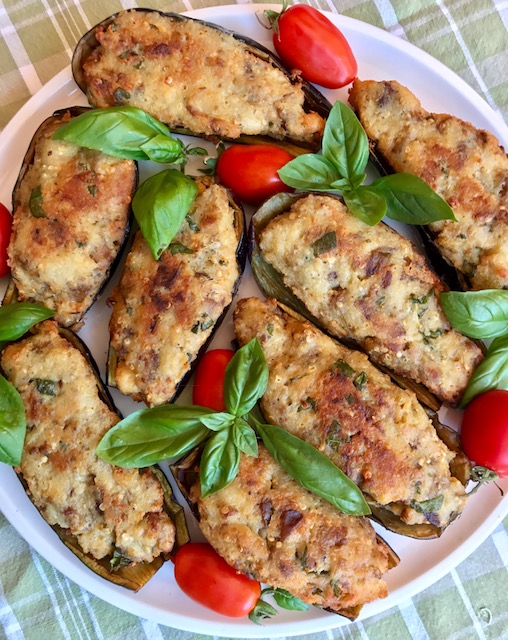
Neapolitan Stuffed Eggplant

In Appetizers / Starters, Vegetables On August 12, 2017 0 Comments

I’ve been making this eggplant recipe since I was 9 years old and living in Campania!

My Nonna (grandmother) used day-old bread and eggplant pulp – diced and fried. She then mixed the breadcrumbs, fried eggplant pulp, eggs, Pecorino-Romano cheese and other basic ingredients. This became the stuffing which was placed back into the shells and deep-fried.

Wondering how the eggplant is stuffed and baked? Read on… it’s worth it! No restaurant serves Neapolitan Stuffed Eggplant.

Prep time: 30 minutes (for frying & cooling) & 30 minutes (for baking)
Makes: 12 servings (leftovers store in airtight container in refrigerator up to 5 days)

Ingredients:
6 Japanese eggplant (small eggplant)
1.5 tablespoons salt
1 quart safflower or sunflower oil
1 day-old Italian bread or French baguette (outer skins cut & discarded) & crumbled with hands
6 large eggs, beaten
1 to 1-1/3 cups grated sharp, imported Pecorino-Romano cheese
6 large basil leaves, finely chopped
Dash grated nutmeg
1/8 teaspoon ground black pepper

Garnish for the Non-Baked Version (in photograph below):
5 to 7 cherry tomatoes or home grown San Marzano tomatoes
5 to 6 fresh basil leaf sprigs, for garnish

Garnish for the Traditional, Baked Version with Tomatoes (in above photograph):
One 32-ounce can diced San Marzano tomatoes
2 tablespoons extra virgin olive oil
1/4 teaspoon salt
1 clove garlic, sliced into 3 to 4 pieces
5 to 6 fresh basil leaf sprigs, for garnish

Cut the Eggplant:
1. Rinse and pat dry the eggplant with paper towels.

2. Remove and discard top end with leaf/stem.

3. Vertically cut the eggplant in half.

4. Take one cut half, insert pointed tip of sharp knife 1/8-inch inside eggplant shell.

5. Using knife tip, cut around the pulp until it comes out in one piece – this may take a little practice.

6. Cut pulp vertically into 1/2-inch strips. Cut strips into 1/2-inch cubes.

7. Set eggplant cubes aside in a colander.

8. Repeat cutting procedure with remaining eggplant. Set aside in colander.

Salt & Fry the Eggplant:
1. Sprinkle the salt all over eggplant cubes in colander & gently toss with hands; let eggplant drain in colander set over a bowl for 20 minutes.

2. After 20 minutes, using cooks’ plastic gloves, take a handful of eggplant cubes and squeeze out the bitter juices over a sink; set eggplant cubes aside in a bowl.

3. Repeat squeezing out the bitter juices with remaining eggplant cubes.

4. Pour the sunflower or safflower oil into a 12-inch frying skillet (preferably stainless steel, as this heats up quickly).

5. Heat the oil.

6. When oil is hot but does not smoke, test one eggplant cube by gently lowering it into oil. If it begins to sizzle, the oil is ready.

7. Fry the eggplant cubes in 2 to 3 batches – eggplant cubes should turn golden brown (not dark brown).

8. Transfer fried eggplant batch to a paper towel-lined platter.

9. After transferring first batch, cover it with paper towels & lay the second batch over them. Repeat with third batch.

10. When eggplant is fried, let it cool so that it is warm to the touch – about 10 to 15 minutes.

11. Save the oil and skillet for frying the stuffed eggplant later.

Prepare Stuffing:
1. Preheat oven to 375°F.

2. Place the crumbled bread & the fried eggplant cubes in a 12-cup mixing bowl; set aside.

3. In a separate bowl, using a whisk or a fork, beat the eggs with 1 cup Pecorino Romano cheese.

4. Gently stir the egg-cheese mixture into the breadcrumbs & eggplant in bowl.

5. Add the chopped basil leaves, dash nutmeg & black pepper.

6. Taste some of the stuffing & check it for cheese level. If needed, add remaining 1/3 cup cheese & a little salt.

Stuff the Eggplant Shells:
1. Divide the stuffing into 12 portions – you may be able to do this visually.

2. Place a portion of the stuffing inside eggplant shell, gently patting it down. It should look a little rounded on top. Set the stuffed eggplant shell, face up, on a platter.

3. Meanwhile, stuff the remaining eggplant shells, setting them aside on the platter.

Fry the Eggplant:
1. Reheat the oil in skillet. When oil is hot but does not smoke, gently and carefully lower one stuffed eggplant, face down, into oil. Repeat with a few more stuffed eggplants until they fit comfortably in skillet (about 5 pieces).

2. Fry the eggplant for about 3 minutes; check underside with a spatula. If eggplant is not golden brown, fry it for an additional 2 to 3 minutes, checking occasionally.

3. When eggplants look golden brown on bottom, using 2 large forks or 1 fork and a spatula, gently turn them over; fry the shell side for 3 to 4 minutes.

4. At this point, you can serve the stuffed eggplant without baking it – it will be drier than the traditional, baked version:

For this Non-Baked Version, transfer stuffed eggplant to a platter and garnish with fresh tomatoes & basil sprigs:
Image.NeapolitanStuffedEggplant

For the Traditional Baked Version with Tomatoes (featured in photograph at the top of this page):
1. In a 16X9-inch Pyrex baking dish, spread out half of the canned, diced tomatoes.

2. Sprinkle olive oil over tomatoes, followed by salt and garlic.

3. Lay the stuffed eggplant over the tomato mixture in Pyrex dish.

4. Evenly spread the remaining diced tomatoes over stuffed eggplant in Pyrex dish. Add a dash of salt.

5. Cover the eggplant tightly with aluminum foil & bake on a rack set in center of oven for 30 minutes.

6. After 30 minutes, transfer the Pyrex dish with eggplant to a rack or trivet on kitchen counter.

7. Let the stuffed eggplant cool down for about 10 minutes.

8. You can serve this Neapolitan Stuffed Eggplant as an appetizer (by itself) or as lunch/dinner, accompanied by a green salad on the side.
Buon Appetito!

Italian Wine Pairings: Greco di Tufo (white wine) or Aglianico (red wine). Both wines are from the area of Naples in the region of Campania, Italy.

Text & Photographs ©2017 Nancy DeLucia Real

Cactus Salad (Ensalada de nopales)

In Salads, Vegetables On July 25, 2017 0 Comments

Nopal is from the Nahuatl word nohpalli for the pads of the cactus plant. There are over 100 known species of cactus in Mexico. The nopal pads are eaten raw, cooked and even grilled. They are used in stews, soups, jams and salads.

The best way to start this classic Mexican salad is to buy fresh cactus pads at a Latin American or Mexican supermarket. Here’s what a cactus pad or nopal looks like (don’t forget to buy this with thorns removed!):

Image.NopalWikipediaZoofariAttribution Photograph Attribution: Zoofari at English Wikipedia

Since nopales are abundant in Vitamin C and Manganese, you’ll enjoy a cactus salad that is delicious and good for you. Buen provecho!

Prep time: 15 minutes
Cook time: 10 minutes
Serves: 4 to 6

Ingredients:
6 to 8 nopales (cactus leaves), thorns removed
½ of a brown or white onion
3 whole garlic cloves, peeled
½ of a red onion
2 medium, vine-ripened tomatoes
1 Serrano or Jalapeño chile
1 cup loosely-packed cilantro leaves
¼ cup extra virgin olive oil
salt, to taste

Directions:
1. Working on a chopping board, cut the cactus leaves into ¼-inch thick strips.

2. Cut the strips into ¼-inch pieces; set aside in a bowl.

3. In a 4-quart saucepot, bring water to a boil. Add half of the brown or white onion and garlic cloves to water; boil for 3 to 5 minutes.

4. Add chopped nopales to the onion-garlic water; cook on medium, uncovered, for 5 minutes or until the green color has become lighter.

5. After 5 minutes, add ¾ teaspoon salt and taste a few nopal pieces – the texture should be crunchy-tender, not overcooked.

6. Place a colander in sink and drain the nopales. Run cold water through nopales; set aside in colander set over a bowl to drain.

Prepare Remaining Salad Ingredients:
1. Finely chop red onion and place it in a bowl, covered with cold water; set aside.

2. Cut each tomato in half; scoop out and discard the pulp.

3. Cut tomato flesh into ¼-inch strips; cut each strip into 1/4-inch pieces.

4. Place chopped tomatoes in a 2-quart glass or porcelain bowl.

5. Add drained nopales to the tomatoes in bowl.

6. Lift chopped onion out of water; squeeze out the excess water. Add onion to nopales mixture in bowl.

7. Finely chop Serrano or Jalapeño chile; add it to the nopales mixture in bowl.

8. Rinse cilantro in cold water and finely chop it; add cilantro to nopales salad.

9. Stir in the extra virgin olive oil with about ½ teaspoon salt; taste salad and adjust seasonings. Serve immediately.
Text & Cactus Salad Photograph ©2017 Nancy DeLucia Real

Chard, Celery & Onions (Acquacotta – Italian)

In Appetizers / Starters, Vegetables On July 15, 2017 0 Comments

Acquacotta literally means “cooked water” and is one of the classic vegetable soups of Tuscany. This dish is made with simple ingredients – chard, onion and celery. Acquacotta is served over fresh slices of bread and chilled white wine. You can’t ask for a healthier or more delicious appetizer!

Prep time: 20 minutes
Serves: 4 to 6

Ingredients:
1 bunch fresh, Swiss chard (green or red)
3 celery stalks
1 small brown or white onion
2 to 3 tablespoons extra virgin olive oil
salt and grind black pepper, to taste
6 to 8 slices Italian or French bread

Directions:
1. Trim and discard the stems from the chard.

2. Cut chard leaves into 3-inch pieces wash leaves and spin-dry (do this 3 times to ensure all dirt particles are gone).

3. Peel the celery stalks and chop them into 1/2-inch pieces; set aside.

4. Peel the onion and cut it in half. Cut each onion half into thin slices.

5. In a 12-inch skillet, heat the oil on medium-high setting.

6. When oil is hot, add the celery and onion; stir-fry until onion is translucent and light golden.

7. Toss in the chard.

8. Using tongs, gently mix celery, onion and chard together.

9. Cook the chard mixture on medium-high heat until chard has wilted (it should look almost raw).

10. Add salt and ground black pepper, to taste.

11. Place the bread slices on a serving platter; divide the Acquacotta evenly over bread slices. Serve immediately.
Text & Photograph ©2017 Nancy DeLucia Real

Mosaic Gelatin Dessert

In Desserts, Creams & Sauces On July 1, 2017 0 Comments

This dessert is based on multi-colored cubes of Jell-O, mixed with evaporated and condensed milks with vanilla. All you have to do is assemble the ingredients in a Bundt pan and unmold the set gelatin. Isn’t it cool?

That’s right – our Mosaic Gelatin Dessert is beautiful to look at, cool and refreshing. Enjoy it for our July 4th weekend holiday!

Prep time: 30 to 45 minutes (to cut the Jell-O into cubes)
Set time:  Make boxed Jell-O recipes and set overnight
Make Mosaic Gelatin Dessert the next day and set overnight.

Ingredients:
One 3-ounce box strawberry or raspberry-flavored Jell-O
One 3-ounce box orange-flavored Jell-O
One 3-ounce box grape-flavored Jell-O
4 envelopes Knox unflavored gelatin
1 cup cold water
One 14-ounce can sweetened, condensed milk
One 7.6-ounce can Nestle brand Media Crema (this is cream)
One 12-ounce can evaporated milk
1 teaspoon vanilla
8 fresh mint leaf sprigs, for garnish

Directions:
1. Prepare each Jell-O recipe according to package directions, but use 1/8 cup less water for each box (this will ensure a firmer Jell-O for cutting into cubes later).

2. When making each Jell-O recipe, prepare it in a 10 X 10-inch square glass or porcelain baking dish.

3. Refrigerate each Jell-O recipe 6 hours or overnight, uncovered.

4. After the Jell-O’s have set completely, cut each Jell-O into long, 1/2-inch thick strips.

5. Cut each strip into a 1/2-inch cube.

6. As you cut and amass cubes of Jell-0, gently transfer them to a 12-cup Bundt pan; set aside.

7. Pour the 4 envelopes of gelatin into a 2-cup bowl. Add the water, mix and let it stand; set aside.

8. In a blender, combine the Knox set gelatin, condensed milk, Nestle Media Crema, evaporated milk and vanilla.

9. Puree the milk and gelatin mixture until uniform.

10. Gently pour the milk mixture over Jell-O cubes in Bundt pan.

11. Transfer the gelatin in Bundt pan to a refrigerator and let it set overnight, uncovered.

12. When ready to serve, place the Bundt pan in a large bowl filled with hot water.

13. Run a knife between edges of Bundt pan and gelatin dessert. Lift Bundt pan out of water and twist it in the air to loosen the gelatin dessert.

14. Place a platter over the gelatin dessert in Bundt pan and quickly invert.

15. Garnish with fresh mint leaf sprigs and serve immediately.
Text and Photograph ©2017 Nancy DeLucia Real

Grilled Octopus with Red Bell Pepper Pesto

In Fish & Shellfish On June 16, 2017 0 Comments

I finally figured out how to transform the rubbery “look” of octopus into a tender delicacy. Here it is:

Prep time: 10 minutes (pesto) and 45 minutes (for boiling octopus)
Serves: 4 (as an appetizer)

First, make the Red Bell Pepper Pesto-
Ingredients for Red Bell Pepper Pesto:
2 red bell peppers
2 garlic cloves, hearts removed
3/4 cup raw, slivered almonds
3 to 5 tablespoons extra virgin olive oil
2 tablespoons tomato paste
1 tablespoon white wine vinegar
1/4 teaspoon crushed red chili pepper flakes
1/4 teaspoon ground paprika
1/3 cup cold water
Salt and ground black pepper, to taste

Directions:
1. Lay the bell peppers and garlic on a baking sheet lined with parchment paper.

2. Transfer the baking sheet to an oven rack positioned 6 inches away from oven top broiler element.

3. Broil the peppers and garlic until charred – about 7 minutes; turn them over and grill the other side.

4. When peppers and garlic are charred, transfer them to a cold plate; set aside to cool.

5. When peppers are cool enough to handle, peel them and discard skins. Remove and discard stems and seeds.

6. Transfer peppers and remaining ingredients to a food processor; process until a paste (pesto) forms.

7. Using a spoon, taste the pesto. If it is too thin, cover the food processor and add 2 more tablespoons olive oil in a thin stream. Taste again and, if needed, adjust salt & pepper levels.

8. Transfer the pesto to a glass or porcelain jar, cover and refrigerate.

Meanwhile, prepare the octopus:

Ingredients for the Octopus:
1 whole octopus (fresh or frozen and thawed)
2 tablespoons olive oil, to oil baking sheet
Mint leaf sprigs, as garnish

Directions:
1. In a 6-quart saucepot, bring water to a boil.

2. Add the octopus to the boiling water and boil for 45 minutes. It will look like this:
Image.OctopusinPot

3. After 45 minutes, prepare a large bowl of cold water with ice cubes.

4. Using tongs, carefully lift octopus from boiling water and immediately transfer it to the ice bath:
Image.OctopusIce

5. Wait 5 minutes for the octopus to cool. After it has cooled, drain the water from the octopus. Face down, the octopus will look like this:
Image.OctopusFaceDown

6. Turn the octopus face-up. It will look like this (I know it looks kinda gross, but bear with me):
Image.OctopustoBehead

7. Cut off the head and discard it.

8. Cut all the tentacles in a vertical manner (do not discard any flesh) and place them on an oiled baking sheet lined with aluminum foil.

9. Remove the fatty, purple skin (on the underside only- do not remove the suction cups) to expose the white flesh. The octopus legs will look like this:
Image.OctopustoGrill

10. Brush the octopus tentacles with olive oil; sprinkle them with salt and ground black pepper.

11. Place the baking sheet with octopus on an oven rack positioned 6 inches below top broiler element.

12. Broil/grill the octopus for 12 to 15 minutes.

13. After 12 to 15 minutes, transfer the octopus to a plate & garnish with mint leaves.

14. Serve immediately with Red Bell Pepper Pesto.

Did you bear with me? Here’s our final delicacy:
Image.GrilledOctopusFinal
Wine Pairing Suggestion: Chilled Chardonnay or Pinot Grigio.
Text and Photographs ©2017 Nancy DeLucia Real