All Posts By: NANCY DeLUCIA REAL

Home » Articles posted by NANCY DeLUCIA REAL (Page 65)

Halloween Tombs & Cupcakes

In Cakes & Cupcakes, Holidays On October 6, 2010 2 Comments

A few weeks ago, I was shopping at an arts and crafts store and noticed candy molds for skeletons and cakes. Making Halloween desserts with such fun decorations is a great art project for kids and adults. You’ll have a blast assembling the tombs and decorating the cupcakes. During this graveyard project, you won’t be able to resist tasting the candies and cakes. However, be sure to leave a few for your guests!

Prep time: 45 minutes (for the green skeleton candies & cupcakes)
Bake time: 25 minutes
Frosting time: 15 minutes
Makes: 8 tombs & 8 cupcakes

MAKE THE SKELETON CANDIES:
One 14-ounce bag Wilton® White Candy Melts
4 drops green food color
Pastry bag fitted with a star tip
Skeleton design candy molds

1. Melt the candies in a double boiler or in a microwave (follow microwave directions on package).

2. Using a wooden spoon, immediately stir the green food color into melted candy.

3. Set container with melted candy on a counter to cool 5 to 8 minutes.

4. Carefully spoon the melted candy into the bottom of a pastry bag fitted with a star tip.

5. Squeeze the pastry bag to overfill each skeleton mold – the top of each mold should look like it has a cloud of melted candy over it. Using a long metal spatula, scrape off the extra candy.

6. Set the mold in freezer, about 8 to 10 minutes or until candies have hardened.

7. Unmold candies onto a flat surface and set aside. Repeat filling the mold, freezing and unmolding the hardened candies until there are enough candy parts to form 8 complete skeletons.

8. If making ahead, set the skeleton candies in layers with paper towels in between each candy layer – inside a sealable plastic container. Make sure the candies do not touch. Freeze candies until ready to use.

FOR THE TOMBS & CUPCAKES:
5 mini loaf pans (5 X 3 X 1-7/8), greased and floured
8 Halloween baking cups, set in a muffin baking pan
One box Devil’s Food cake mix (1 lb. 2.25 oz.)
One Wilton® Orange Decorating Icing tube (4.25 oz.)
Decorating Plastic Tips to attach to icing tube
Halloween candies or decorations

1. Preheat oven to 350˚F. Prepare cake mix per package directions.

2. Pour a scant 2/3 cup cake batter into each loaf pan and divide remaining batter evenly among 8 baking cups set in a muffin pan.

3. Set the loaf pans on bottom oven rack. Set the muffin pan on top oven rack.

4. Bake 18 to 20 minutes or until knife inserted in center of loaves and cupcakes comes out clean. If knife is coated with batter, bake an additional 5 minutes.

5. Transfer the loaf pans and muffin pan with cupcakes to a counter to cool completely. Unmold the loaves.

6. If making a day ahead, set loaves and cupcakes on a flat plate. Cover them with aluminum foil wrap and set aside on counter overnight.

PREPARE THE FROSTING & GARNISH:

1. With loaves right side up, horizontally slice off the rounded tops.

2. Set two of the sliced-off tops in a bowl and crumble – this will be used as edible earth around the loaves or tombs.

3. Arrange candies in each of the 8 tombs to form a complete skeleton and set aside.

4. Frost the cupcakes with the orange icing tube (fitted with a decorator tip).

5. Arrange tombs and cupcakes on a large platter with crumbled “earth” around them. Add Halloween candies as part of the decoration.

Happy Halloween!

Note: White Candy Melts, candy molds, pastry bags, premade orange frosting tubes, decorator tip attachments and Halloween baking cups can be found at party supply and/or arts and crafts stores.

Text and Photographs ©2010 Nancy DeLucia Real

Columbus Day Corn Bread

In Breads, Crêpes, Pancakes & Puddings, Holidays On September 29, 2010 0 Comments

Lately, I’ve been thinking of our October holiday honoring Christopher Columbus who arrived in America in 1492. I imagined him stepping off his ship in America, encountering an indigenous culture and new culinary delights – some made with corn or "maize". This idea inspired me to kick up our usual cornbread recipe with different ingredients. To test my invention, I recently brought this cornbread to work and set it on our kitchen counter. Everyone seemed to like it because it disappeared in under an hour – Happy Columbus Day!

Prep time: 20 minutes
Bake time: 25 to 30 minutes
Servings: 12 to 14

Ingredients:
1 small zucchini, cut in chunks
1 small carrot, cut in chunks
1/2 red bell pepper, cut in chunks
2 tablespoons vegetable oil
1 teaspoon salt
1-1/4 cup yellow cornmeal
1-1/4 cup all-purpose, unbleached flour
1-1/2 tablespoons baking powder
2 large eggs
1/3 cup granulated sugar
1/2 cup vegetable oil
1/2 cup milk (whole or 2% milk fat)

1. Heat oven to 400˚F. Grease and flour a 9-inch spring form pan or regular cake pan; set aside.

2. In a food processor, pulse-blend the zucchini, carrot and bell pepper chunks until chopped but not mashed; set aside.

3. In a 12-inch nonstick skillet, heat the 2 tablespoons oil and stir fry the chopped vegetables on medium high heat for 1 to 2 minutes.

4. Stir in 1/4 teaspoon salt, transfer the vegetables to a plate and set aside to cool.

5. Meanwhile, in a 2-quart mixing bowl, combine the remaining 3/4 teaspoon salt, cornmeal, flour and baking powder; set aside.

6. In a 4-quart mixing bowl, with a wire whisk, mix the eggs and sugar until uniform.

7. Stir in the oil and milk. With a wooden spoon, add the combined dry ingredients and mix until blended – do not overmix.

8. Gently stir the cooled vegetables into the batter; pour batter into prepared pan.

9. Set the pan on a rack positioned in center of oven for 25 minutes.

10. After 25 minutes, check doneness by inserting a pointed knife in center of cornbread – knife should come out clean. If knife has wet batter around it, bake cornbread for an additional 5 minutes.

11. Remove cornbread from oven and set on a counter to cool. When it is warm, loosen and remove spring form pan sides and slice the cornbread. If using a regular cake pan, loosen sides of cornbread with a knife and flip onto a flat plate. Slice and serve.

Enjoy the warm cornbread with soups, stews or chili.

Text and Photographs ©2010 Nancy DeLucia Real

Mozzarella di Bufala Starters

In Appetizers / Starters On September 27, 2010 0 Comments

Mozzarella di bufala is made with fresh buffalo milk. This delicacy is a specialty of Campania, Italy, where the production of dairy products is rooted in the region’s ancient Greco-Roman past. In 1570, the great connnoisseur of regional Italian cookery, Bartolomeo Scappi, mentioned “mozzarella di bufala” for the first time in his culinary treatise, Opera. The word “mozzarella” derives from the verb “mozzare”, a hand gesture which divides an elongated piece of “pasta filata” or freshly pulled cheese into single “mozzarelle” (Italian, for mozzarellas).

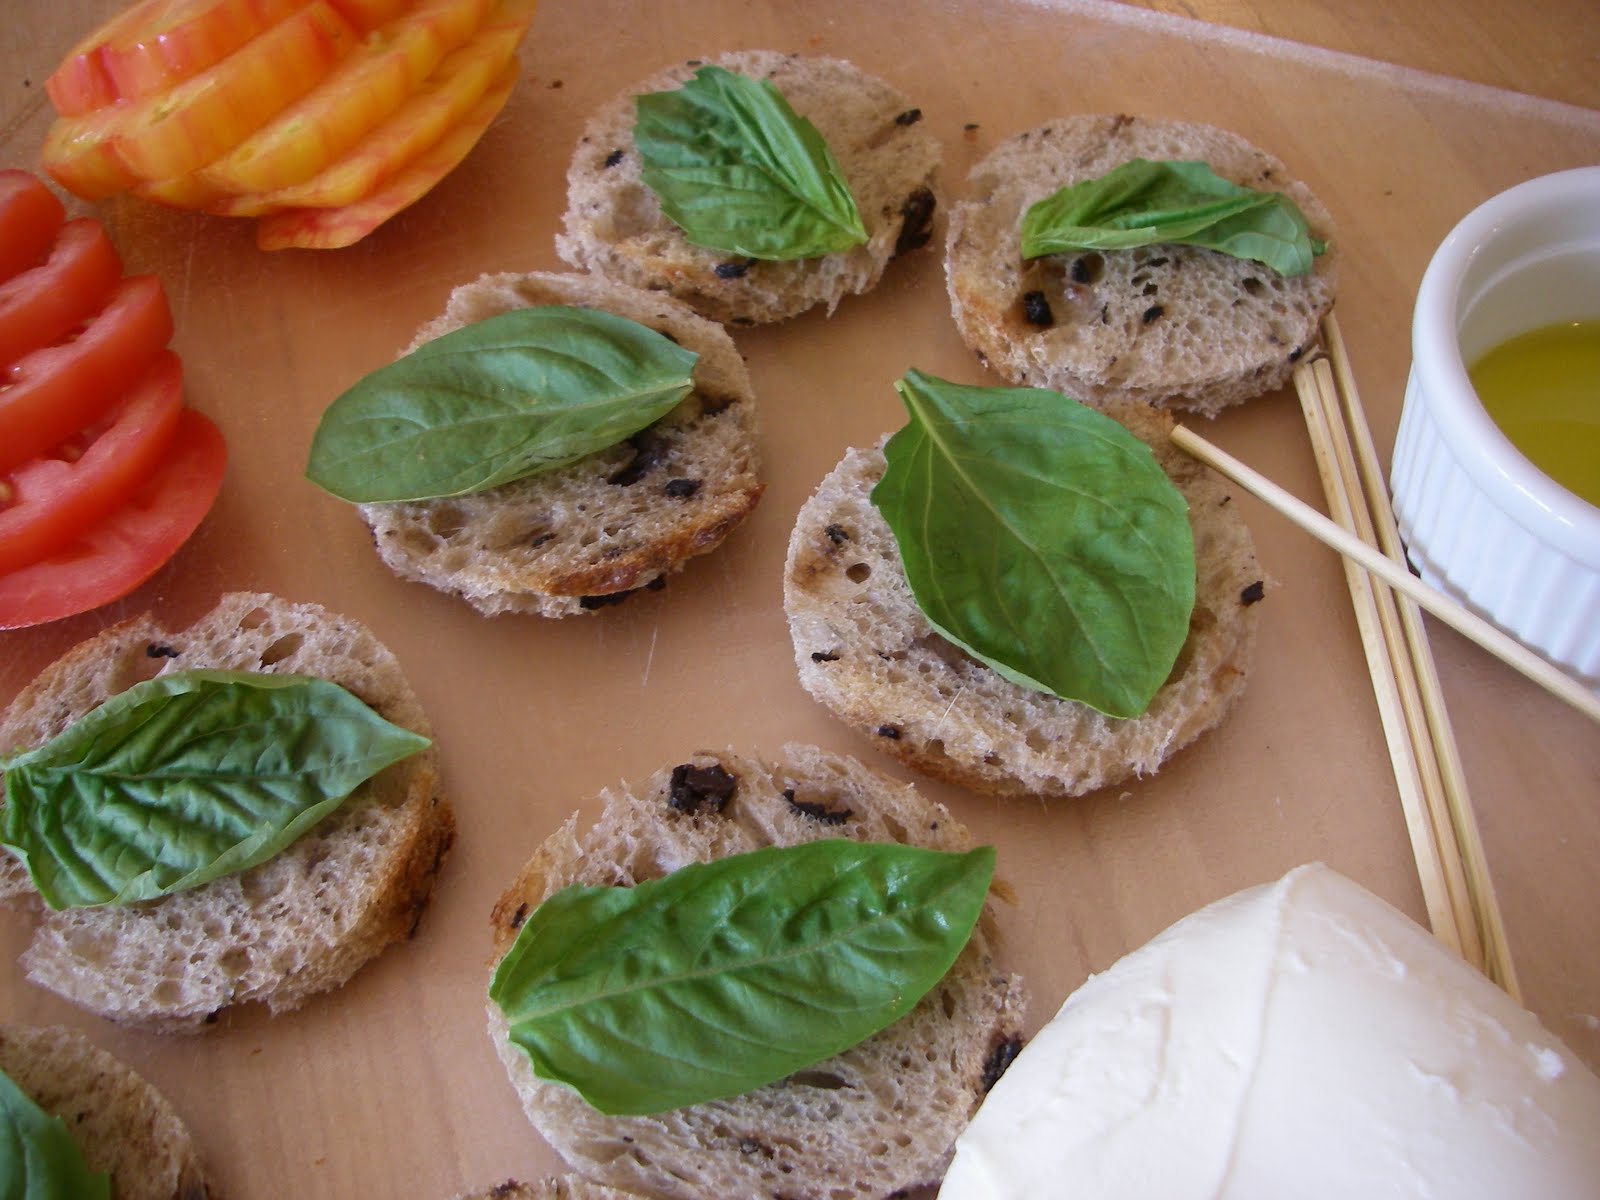
Notice the photo with the mozzarella and layout of ingredients – these starters are intended to be fun to make, pleasing to the eye and exquisite. The final photo is what you get … and what you eat!

Prep time: 15 to 20 minutes
Serves: 4

Ingredients:
One 8-ounce fresh buffalo mozzarella packed in water (cut into 4 slices & then in half
-OR-
Four 2-ounce fresh buffalo mozzarellas (each cut in half)
4 wooden skewers, set aside until ready to use
8 slices olive bread
8 fresh basil leaves
1 vine-ripened tomato, cut into 4 slices
1 Heirloom tomato (reddish-yellow in color), cut into 4 slices
Extra virgin olive oil, for drizzling
Salt and pepper, to taste
12 olives, for garnish

1. If using one 8-ounce mozzarella, cut it into 4 slices and cut each slice in half to yield a total of 8 pieces.
If using four 2-ounce mozzarellas, cut each one in half (you will have a total of 8 pieces). Set aside.

2. Using a 3-inch round cookie cutter or a glass, cut each slice of bread to yield a total of 8 round bread slices. Save the leftover bread pieces in a sealed food storage bag for another use (such as enjoying them on a future binge).

3. For each serving, use 2 bread rounds, 2 basil leaves, 2 mozzarella slices, 1 vine-ripened tomato slice, 1 Heirloom tomato slice and assemble as follows:

4. Push a skewer through the center of one bread round, positioning the bread within a 1/2-inch of the skewer’s tip. Follow with a basil leaf and then alternate the mozzarella and tomato slices. While assembling, drizzle oil and sprinkle a little salt and pepper on the mozzarella slices.

5. End with a basil leaf and a bread round.

6. With shears, trim the remaining skewer, leaving 1/2-inch of the skewer tip outside the bread round.

7. Repeat above assembly three more times. Arrange on a platter, garnish with olives and serve immediately.

Buon Appetito!

Wine suggestion: chilled Greco di Tufo – this is one of my favorite whites from the region of Campania, Italy.

Note: Do not prepare this recipe ahead of time, as the mozzarella will become watery and change its texture.

Text and Photographs ©2010 Nancy DeLucia Real
Obika Mozzarella Bar, Los Angeles (Century City)

In Nancy's Articles On September 24, 2010 6 Comments

If Italy is not in your immediate travel plans and you’re craving fresh mozzarella di bufala, I’ve got the solution for you – Obika Mozzarella Bar.

Upon my recent return from Italy, I was pleasantly surprised to find fresh, high quality mozzarella at Obika in Los Angeles. At Obika’s grand opening on September 14th, I tasted the Fried Breaded Mozzarella di Bufala, Mozzarella Rolls with Smoked Wild Alaskan Salmon and Arugula, and the Affumicata (literally, “smoked mozzarella di bufala”).

Already established in Milan, London, New York, Tokyo and Rome, Obika Los Angeles has fresh mozzarella flown in from dairy farms (located in the southern region of Campania, Italy) three times a week. The mozzarella is made from fresh buffalo milk and has a creamy, luscious texture – a true delicacy!

Five days after its opening, I went back to Obika and had lunch – everything tasted fantastic and I was so pleased with the different ways in which the mozzarella is served, as well as with the selection of wines and foods. One of my favorites is the Layered Grilled Eggplant Parmigiana.

For my incurable sweet tooth, I tasted Ricotta Mousse with Honey, Orange Peel and Pine Nuts; and Tiramisu. I was impressed because I tasted pure, fresh ingredients – hallmarks of “homemade” Italian flavors. Wow!

Obika is high on my list for great food, atmosphere and service.

For more information, check out Obika’s website at http://www.obikala.com

Text and Photographs ©2010 Nancy DeLucia Real

Parma Prosciutto, Melon & Apple Carpaccio

In Appetizers / Starters, Fun Foods On September 18, 2010 0 Comments

For this classic antipasto, I wanted to be artistic and innovative in presenting Parma prosciutto and melon. I added apple “carpaccio” and a balsamic reduction. The balsamic “sauce” complements the sweet fruit and savory prosciutto. Buon Appetito!

Prep time: 20 to 25 minutes
Serves: 4

Ingredients:
1/2 cup Balsamic vinegar (dark brown variety)
1/4 cup granulated sugar
3 to 4 ounces sliced Parma prosciutto
1 cantaloup melon (8 to 12 slices)
2 Heirloom or green apples (Granny Smith or Pippin variety)
Juice of 1 lemon

1. In a small saucepot, combine the vinegar and sugar.

2. Bring to a boil and simmer on medium-high heat until mixture is reduced by half, about 5 minutes.

3. Transfer balsamic reduction to a small glass or porcelain bowl and set, uncovered, in freezer until cold enough to drizzle, about 8 to 10 minutes.

4. Check coolness by stirring with a spoon after 5 minutes and tasting (do not freeze). If reduction is still warm, leave in freezer an additional 5 minutes.

5. Alternatively, the balsamic reduction can be prepared and chilled in refrigerator a day ahead.

Meanwhile, prepare prosciutto and fruit –

1. From its narrow end, gently roll up each prosciutto slice until it forms a small log.

2. Arrange prosciutto logs at one end of a large serving platter and set aside.

3. Cut melon in half, lengthwise, and scoop out seeds and pulp.

4. Cut melon into 8 to 12 slices, remove rind and place next to prosciutto on platter. Set aside. Save remaining melon for future use.

5. Cut apples in half and then into fourths. Remove core from each fourth and then cut apples into thin slices.

6. Immediately sprinkle apple slices with the lemon juice – this avoids blackening.

7. Arrange apples decoratively on platter with prosciutto and melon.

8. Serve immediately – ask guests to help themselves to some prosciutto, melon and apples and to drizzle some balsamic sauce over apples.

Enjoy with bread and white wine.

Wine suggestion: Malvasia or Greco di Tufo (both are Italian whites).

Text and Photographs ©2010 Nancy DeLucia Real