Symbolizing fertility, eggs are featured in the traditional foods of many cultures during Springtime.
In Italian gastronomy, colorful eggs are used to decorate baked delicacies at Easter. They are reminiscent of rebirth and the resurrection of Jesus Christ.
Celebrate Spring or Easter by making this festive bread known as pane di Pasqua. – Italian, for Easter Bread!
Active Prep Time: 45 minutes (for making dough & coloring eggs)
Inactive Prep Time: 90 minutes (for two dough risings of 45 minutes each)
Bake Time: 30 to 35 minutes
Prepare the Yeast Starter:
1/2 cup water
1 envelope (7 grams or 1/4-ounce) active dry yeast
1/2 teaspoon granulated sugar
1. In a 1-pint metal bowl, combine the dry yeast and the sugar; set aside.
2. In a 1-pint sauce pot, heat the water until it is warm, but not hot.
3. Pour the warm water over the yeast-sugar mixture.
4. Swirl the bowl slightly to mix the dry and wet ingredients gently.
5. Cover the bowl and place it on a wood board for 15 minutes.
6. Meanwhile, assemble the dough ingredients as follows:
Prepare the Dough:
1/2 cup water
1/2 cup milk
1 large egg
3/4 cup granulated sugar
1/4 cup vegetable oil
1 teaspoon vanilla extract
3 tablespoons rum (light or dark)
1/4 teaspoon ground cinnamon
1/2 teaspoon salt
3-1/2 to 3-3/4 cups all-purpose, unbleached organic flour
1. Heat the water and milk together in a 1-quart sauce pot until the liquid is barely lukewarm; set aside.
2. After the yeast mixture has risen for 15 minutes, it will look puffy. Transfer it to a 6 to 8-quart mixing bowl or a stand mixer.
3. Whether using a hand mixer or the stand mixer, on low speed, stir in the water-milk liquid, egg, sugar, oil, vanilla, rum, cinnamon and salt.
4. When the mixture is smooth, gradually stir in the flour, 1 cup at a time.
5. Each time you add 1 cup of the flour, make sure the batter that forms is smooth and uniform.
6. After adding about 3 cups of the flour, a dough should form. It will be thick and sticky.
7. At this point, use a wooden spoon to mix in an additional 1/2 to 3/4 cup flour.
8. The dough should amalgamate and become semi firm, but soft and easy to handle.
9. Transfer the dough to a smooth, lightly floured wood board and knead it lightly until dough is uniform. [When kneading, to prevent dough from sticking to the board, lightly add flour to top of dough and wood surface.]
NOTE: Do not place the dough on marble, granite or tile, as these surfaces are too cold and will halt the rising process of the dough.
10. When the dough is smooth, set it aside.
11. Oil an 8-quart bowl; transfer the dough to the oiled bowl.
12. Cover the bowl with a clean kitchen towel; set bowl away from draft and let dough rise for 45 minutes.
13. After 45 minutes, punch down the dough and, with a knife, divide it into 3 equal pieces.
14. Shape each of the 3 dough pieces into a ball; set them aside.
15. Take one dough ball and place it on a lightly-floured wood board. Gently begin rolling the dough ball, stretching it to out, to the sides.
16. As you roll the dough ball, it will elongate.
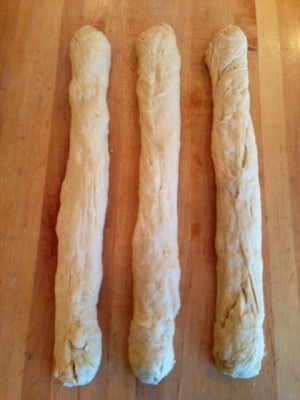
17. Continue the rolling and stretching process until you have made a strand of dough measuring 23 to 24 inches in length. Set the dough strand aside.
18. Repeat the above rolling and stretching technique for the remaining two dough balls. You should now have three strands of dough.
19. Place the three strands of dough next to each other, to form three rows (they will be parallel to each other):
20. At one end of the dough strands, press them into each other so that they hold together. Begin forming a braid:
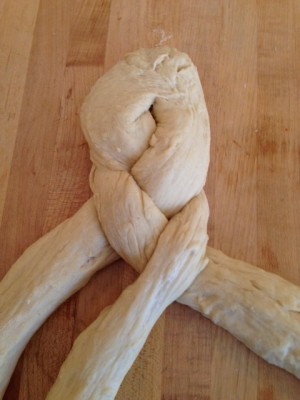
21. After completing the braid, shape it into a wreath. Press edges together to close the wreath (it will be a circle). Set the dough wreath aside:

22. Meanwhile, line an 18-inch X 12-inch baking sheet with parchment paper.
23. Gently lift and quickly transfer the wreath onto the parchment-lined baking sheet.
24. Cover the wreath with a clean kitchen towel; set baking sheet with wreath aside on a wood surface or in a cold oven to rise for 45 minutes.
25. After 45 minutes, preheat the oven to 375°F. In the meantime:
Prepare Egg Wash & Decoration:
3 colored Easter eggs (made a day ahead, per instructions on one Easter egg coloring kit)
1 egg yolk, mixed with 1 teaspoon cold water (this is the egg wash)
Nonpareils candies
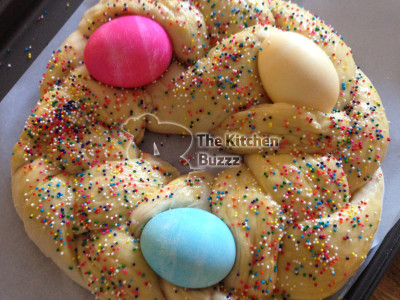
1. Place the colored eggs, spaced evenly, over wreath; gently push them into dough until they are snug.
2. Brush top of wreath with egg wash (DO NOT BRUSH THE COLORED EGGS).
3. Sprinkle the wreath with nonpareils candies:
Bake the Bread:
1. Place the baking sheet with wreath on a rack positioned in center of preheated oven.
2. Bake the bread for 30 minutes. After 30 minutes, insert a pointed knife in the bread. It should come out clean. If not, bake the bread for 5 more minutes.
3. After 30 to 35 minutes of baking, transfer the baking sheet with bread to a counter to cool (at this point, marble granite or tile counters can be used).
4. Serve the Easter bread warm or at room temperature, but cutting it into 2-inch thick slices.
TO STORE: After the bread has cooled completely, cut it into 4 sections. Wrap each section in plastic wrap and place it in double freezer bags. Freeze the sectioned bread for up to one month.
TO THAW: Remove bread section(s) from freezer bags and unwrap. Place the bread section on a plate, covered with a new sheet of plastic wrap, to thaw for 1 to 2 hours. Slice the bread and serve.
Text & Photographs © Nancy DeLucia Real


 Nancy DeLucia Real is an art historian and chef. She has led culinary courses at the Italian Cultural Institute, The Getty Center and The Getty Villa and is a former member of the Culinary Historians of Southern California. Nancy's gastronomy training took place in the heart of Italy under the tutelage of her grandmother. She has taught international cuisine at Williams Sonoma and Sur la Table Stores. Nancy's art history & culinary courses are ongoing at various institutions. She also teaches private cooking classes.

