All Posts By: NANCY DeLUCIA REAL

Home » Articles posted by NANCY DeLUCIA REAL (Page 51)

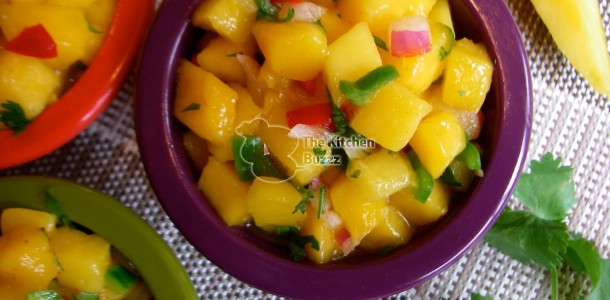
Mango Salsa

In Salad Dressings, Salsas & Savory Sauces On October 20, 2011 0 Comments

ENTER OUR KITCHEN, WATCH & LEARN

Mangoes are my favorite fruit. They are commonly grown in areas of Asia, Mexico as well as in other warm countries. The flesh of a mango is bright yellow or orange, juicy, sweet and slightly tart (when half-ripened). This sensory experience usually makes me forget that I’m merely eating a fruit. I often incorporate the exotic mango in my Indian, Mexican and California dishes.

In my home, this “hot” Mango Salsa is in such high demand that it doesn’t last very long. When preparing the salsa, you won’t be able to stop yourself from “tasting” at least half of it. Be sure to double up on the ingredients when you go shopping or there will be nothing left for your guests!

Buen Provecho (Spanish, for “Bon Appetit”).

Prep time: 15 to 20 minutes
Makes: 3 cups

Ingredients:
2 large, ripe mangos, peeled and diced
2 to 3 tablespoons finely chopped red onion
2 tablespoons finely chopped green bell pepper
2 tablespoons finely chopped red bell pepper
½ jalapeño pepper, minced
Juice of ½ a lime or lemon
Dash chipotle ahumado powder* (optional)
1 tablespoon white Balsamic vinegar
1 tablespoon olive oil
1/8 teaspoon salt

1. Combine all ingredients in a 1 or 2-quart mixing bowl. Taste and adjust seasonings.

2. Stir and serve immediately.

3. Alternatively, the salsa can be refrigerated 2 to 4 hours before serving.

As an appetizer, serve Mango Salsa with tortilla chips or tostada shells.

Mango Salsa can be served as part of a salad course or as a side dish, complementing poultry, meat or fish.

Note: Mango Salsa is best served the same day, but will keep refrigerated up to two days. Overnight, the mango’s texture becomes soft and the salsa mixture is slightly watery but still delicious.

*Chipotle ahumado powder can be purchased online at gourmetsleuth.com.

Text & Photograph © 2011 Nancy DeLucia Real

Potato Ghosts

In Holidays On October 10, 2011 0 Comments

Last year The Kitchen Buzzz featured Halloween Tombs & Cupcakes made with white chocolate candy and chocolate cake.

This year, our Halloween team shifted from sweet to healthy. Our treats are made with potatoes which are loaded with potassium and vitamin B6. In our test kitchens, we had Moms boil and mash the potatoes. The kids had a blast as they swirled the piping bags onto baking sheets to shape their little Potato Ghosts. Setting the eyes and watching the ghosts “disappear” in no time was the funnest part.

Have fun at your spooky Halloween dinner and stay safe when you go Trick or Treating!

Active prep time: 20 to 25 minutes
Inactive prep time: 20 to 25 minutes
Makes: 16 to 20 potato ghosts

Ingredients:
3 medium-large Russet potatoes (peeled & cut into one-inch chunks)
1 teaspoon salt
1 tablespoon butter or margarine
1/4 to 1/3 cup milk (whole, 2% or 1% milk)
32 to 40 whole, black peppercorns
Plastic piping bag fitted with a large star tip
One large baking sheet, greased & floured

1. Put potato chunks in a 4 to 5-quart saucepot. Cover with cold water and bring to a boil over high heat setting (covered).

2. Uncover saucepot and boil/cook on medium-high heat 9 to 10 minutes or until potatoes are cooked through.

3. Drain drain potatoes completely and return them to the saucepot or place in a mixing bowl.

4. Using a hand beater (or in a stand mixer), beat the potatoes on high.

5. Stir in the butter or margarine and the lesser amount of milk; continue beating until potatoes are smooth and uniform.

6. The potato mash should have a firm consistency as opposed to being too creamy. Taste and adjust salt level, if needed.

7. Set potato mash aside to cool for 7 to 10 minutes.

8. When it is cool, transfer potato mash to piping bag.

9. In a circular motion, pipe a continuous circle on baking sheet, beginning with a 3-inch diameter and tapering up to a point, about 3 to 4 inches high.

10. Repeat until 16 to 20 Potato Ghosts have been shaped.

11. For the “ghost’s eyes”, carefully set two peppercorns in each of the ghosts’ heads.

12. Set baking sheet with ghosts on top oven rack, positioned six to eight inches away from top oven grill element.

13. Broil Potato Ghosts for 3 to 5 minutes or until their tops turn golden.

14. Carefully remove Potato Ghosts with a spatula and serve immediately as a side to meat, chicken or fish.

Text & Photograph © 2011 Nancy DeLucia Real
TiramiFlan

In Desserts, Creams & Sauces On October 1, 2011 0 Comments

As a longtime Californian, I’ve traveled across the border to Mexico quite often. Its happy people, history, culture and foods fascinate me. No doubt, my Italian cooking has been “influenced” by the exotic foods of Mexico.

For example, two weeks ago I wanted to make an Italian dessert known as Tiramisu, but I was out of ladyfinger cookies. Nothing could stop me from making something that tasted Tiramisu-ish! When I combined mascarpone cheese and espresso coffee with Mexican custard ingredients, this exquisite TiramiFlan was born!

Active prep time: 15 minutes
Bake time: 55 to 60 minutes
Inactive prep time: 4 hours or overnight refrigeration

Ingredients:
1-1/3 cups granulated sugar
One 14-ounce can condensed milk
8 ounces Mascarpone cheese
4 large eggs
1 teaspoon vanilla extract
1/3 cup strongly brewed espresso coffee, cooled
One 10-inch glass pie plate
One 13x13x4-inch square baking pan (pan sides must be at least 4 inches high)
8 to 10 strawberries, for garnish

MELT THE SUGAR & PREPARE THE PIE PLATE:

1. Preheat oven to 375˚F.

2. Place sugar in a 12-inch, nonstick skillet over medium-high heat setting.

3. When sugar begins to melt, quickly change heat setting to low.

4. Lift, tilt and shake pan constantly to avoid blackening the sugar.

5. With a wooden spoon, gently stir the sugar – it will continue melting. When sugar turns amber throughout, immediately pour it into a glass pie plate.

6. Immediately lift and tilt plate until bottom and sides are coated with melted sugar; set aside.

PREPARE & BAKE THE FLAN:

1. Meanwhile, bring a full kettle of water to boil on medium heat. While waiting for water to boil, proceed to the next step.

2. In a stand mixer or in a 5-quart mixing bowl, beat together the condensed milk, Mascarpone cheese, eggs, vanilla and brewed espresso (on low speed); set aside.

3. Place the 13x13x4 square baking pan on an oven rack that is positioned in center of oven; pull the oven rack with the pan halfway out of oven.

4. Place the sugar-coated pie plate in the center of the square pan.

5. Immediately pour the liquid flan mixture into the pie plate.

6. Gently and carefully pour the boiling water into the square pan until water rises 2/3 of the way up sides of pie plate.

7. Carefully and slowly push the oven rack back inside oven.

8. Bake the flan 50 minutes. After 50 minutes, insert a pointed knife in center of flan. If knife come out clean, the flan is done. If not, cook an additional 10 minutes.

9. Carefully transfer the square pan with water and flan to kitchen counter to cool 30 to 40 minutes.

10. After 40 minutes, remove pie plate from water and set on counter.

COOLING THE FLAN:

1. When the flan is room temperature, refrigerate it for at least 4 hours or overnight.

INSTRUCTIONS FOR UNMOLDING THE FLAN:

1. After the flan has cooled 4 hours or overnight, pour 4 cups hot water in a 13x13x4 square baking pan or extra large glass bowl.

2. Gently place the flan pie plate in the hot water for 2 to 3 minutes. With a rounded knife or a spatula, gently loosen the sides of the flan from the plate.

3. Lift the plate out of the water and wiggle or shake it. When the flan has loosened from sides of plate, set it on a counter.

4. Place a large serving platter over top of the flan plate and, with one hand underneath flan plate and the other hand securely on top of the platter, make a quick flip.

5. At serving time, garnish the TiramiFlan with strawberries.

Text & Photograph © 2011 Nancy DeLucia Real

Salami Mozzarella Quesadilla

In Appetizers / Starters, Fun Foods On September 20, 2011 0 Comments

This simple-to-make snack, lunch, starter or dinner is fast and fun. I’ve always enjoyed a plain cheese quesadilla, but when I created my own version with Genoa Salami and Mozzarella, it became exquisite!

Top these Italian-Mexican quesadillas with my Salsa and … Whatever recipe. It’ll be amore or amor at first bite!

Prep time: 5 to 8 minutes
Makes: 4 quesadillas

Ingredients:
Four 10-inch flour tortillas
16 slices Genoa Salami, thinly sliced
8 ounces Mozzarella cheese, shredded

1. In a 12-inch nonstick skillet, warm up two tortillas at a time on medium-high heat by flipping them over at 1 to 2-minute intervals.

2. Set burner on low heat setting.

3. Working quickly, lay 4 slices salami on the half side of each tortilla.

4. Top the salami with ¼ of the shredded mozzarella and fold each tortilla in half (you have made a quesadilla).

5. Flip the quesadillas over immediately (to avoid charring the underside).

6. With a spatula, gently press top of each quesadilla to flatten slightly.

7. Flip quesadilla over once or twice or until cheese has melted and starts bubbling along quesadilla edges.

Serve hot with Salsa and … Whatever (published on this blog on June 28, 2010).

Wine pairing suggestion: chilled Pinot Grigio (white) or Cabernet Sauvignon (red).

Text & Photograph © 2011 Nancy DeLucia Real

Lula Cocina Mexicana

In Nancy's Articles On September 6, 2011 0 Comments

Where do you go when you crave Mexican food? Wanna know where I go? For me, it’s Lula Cocina Mexicana in Santa Monica. The first thing I like about this restaurant is its cozy, colorful atmosphere.


Whether you’re seated indoors or in Lula’s vibrant courtyard, your eyes will be entertained

especially once they spot those wonderful bottles of happiness, aka “Tequila”.

I chow down the tortilla chips and salsa as if there’s no tomorrow.

Lula’s Watermelon Margaritas are the best ’cause you can taste the watermelon! Other fun margaritas are the Cadillac, Americana and Blue Adobe. I ain’t tellin’ you what the ingredients are. Maybe I’ll tell you at the end …

Ready to order now? One of my favorites is Carne Asada a La Tampiqueña (marinated, grilled beef served with Poblano chiles, enchilada, rice and beans). Yes, you get all that on your plate and it tastes so homemade. You also get that rolled-up tortilla & fresh guacamole.

Another great entree is the Mexican Cobb Salad made with chicken, bacon, Ranchero cheese, avocado, fresh lettuce and tomato tossed in a red wine vinaigrette. Our servers are so coooool about how picky we are – just tell them what INGREDIENTS you don’t want. At Lula’s everything’s possible!

Now, remember I said I may tell you the ingredients of those margaritas I mentioned? I kinda lied. You’ll have to go to Lula’s Happy Hour and enjoy those drinks in person.

You can order wine, Sangria, Americana, Watermelon or Strawberry Margaritas for only $4.00 a drink.

You can also munch on Taquitos, Quesadillas and much more for only $4.00 per order. I think you figured out that this is the best deal in town – I’ll see you there!

Lula Cocina Mexicana
2700 Main Street
Santa Monica, CA.90405
Telephone: 310-392-5711
www.lulacocinamexicana.com

Text & Photographs © 2011 Nancy DeLucia Real